TBD on Ning
Perennial Pointers
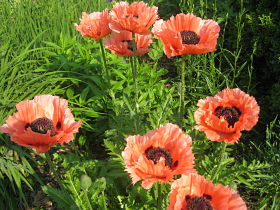
Perennial Oriental poppies add a strong dose of color to my garden in early summer.
Perennial Pointers
Now is the time of year when many of us are arriving home from trips to local nurseries and garden centers in vehicles crammed with pots of new finds for our flower gardens. Choosing new perennials to add to my gardens is one of my favorite ways to lighten my pocketbook. So after I've spent all that money, I want to make sure the plants will thrive when I get them home. Here are some things I've found helpful in getting my new plants off to a strong start.
Ready your planting spot ahead of time
If you are making a new garden, try to have the soil in the bed stripped of sod, free of weeds, and amended with organic matter and any necessary nutrients before bringing home the plants to put in it. A corollary to this is to try not to buy on impulse -- have a garden spot in mind before you purchase a plant. (And yes, a lot of this advice is "Do as I say, not as I've done." I've learned the hard way!)
Have soil moist, but not soggy
If the weather has been dry, lightly water the soil where you'll be putting plants the day before you plan on planting. You want it moist, but not soggy. Water the plants in their pots a few hours before planting as well; again, you want the soil mix moist, but not dripping.
Choose a good planting day
Try to pick a day when cool temperatures or overcast skies are in the forecast. Barring that, plant towards the end of the day so the newly set out plants can adjust overnight. When it comes time to dig the holes for your plants, make them wide and shallow. Try to set the rootball on undisturbed soil so that your plant doesn't sink as the soil settles and end up with its crown too deep, making it susceptible to crown rot. And don't mix granular fertilizer into the soil at planting time. It can burn tender young roots, so wait until next spring to scratch some into the soil around the plant.
Get the plant out of its pot
Now you need to get the plant out of its container. This can sometimes be a challenge. Try spreading your hand across the top of the rootball, with your fingers around the crown of the plant. Then turn the pot upside down and rap the upper edge sharply against a hard surface -- the rootball will usually slide right out into your hand. If all else fails, cut down the sides of the pot with some strong clippers and peel the pot away from the rootball.
Make a rootball review
Next take a look at the rootball itself. Roots should look white or light colored, not black, slimy, or bad-smelling. (If this is the case, I'd suggest returning the plant to the store where you purchased it.) Loosen any circling roots gently with your fingers to get them pointing outwards in the direction you want them to grow.
If the plant is really potbound, with the roots circling round and round the the outside of the ball or in a solid mat at the bottom, your plant will benefit from more drastic measures. Slice into the bottom of the rootball with a sharp knife, cutting about a third of the way up the ball, and gently pull to open it up some. Then make a few shallow vertical cuts part way up the sides of the ball.
Make a mental note to check the rootball at the nursery next time before you purchase a plant. If you aren't comfortable sliding the rootball discreetly out of the container yourself for a peek, ask the nursery or garden center staff to do this for you.
Plant at the proper depth
Spread the roots out as you place the plant into its planting hole and set it so that the crown (where the roots and the top of the plant join) is right at the soil surface or just above if you're planting in heavy soil. Fill in around the rootball with soil and gently firm it down. Next water the around the roots with a mild soluble fertilizer such as fish emulsion. Once the surface water has drained away, recheck the planting depth. Finally, spread an organic mulch such as shredded bark to conserve water and suppress weeds, but make sure the mulch is not up piled up against the crown of the plant.
Provide a little shade
If the weather is hot and sunny, shade your newly set out plants for a day or two while they acclimate to their new surroundings. New plants in an exposed location will also benefit from a little wind protection while they're getting established. Keep plants well-watered that first season, but don't overdo it. Be sure to let the soil dry out some between deep waterings. This effort and attention at planting time will pay you back with the ample reward of thriving, healthy plants for many seasons to come.
Views: 18
© 2025 Created by Aggie.
Powered by
![]()